Archive for the ‘Review’ Category
Chromecast–My experience
Recently I received a Chromecast, it’s a really great addition to my TV and can stream online videos and browse web very easily. Thanks to my brother in law for gifting me one.
Installation
Installing Chromecast is pretty simple, just connect the dongle to the HDMI slot and connect the power source to the TV’s USB slot. If your TV don’t have a USB slot then don’t worry it packed with an external power adapter and can connect to a power outlet.
When I first connected to my TV it is showing only a blank screen with some colored dots. Some google search revealed that it’s because of the Reset button. After doing some analysis of the dongle I realized that, when I insert the dongle to HDMI, the core is pushing backward and jamming the reset button. Thus the device enter into a reset state. If the same issue is happening to you then connect the device and try to pull the cover a little bit so that the reset button wont get stuck and you should be able to click the reset button.
Configuration
Next issue is installing the Chromecast app for my Android tab. I can’t install the app from Play store as I reside in India and the Chromecast is not released here yet. So I downloaded the apk from http://www.apkmaza.com/2013/07/chromecast-111.html and installed it. The setup was quite simple and the Chromecast Android app will guide you through each step. Once the setup is complete the dongle will check for the latest version and update it, if found. So make sure your WiFi router is connected to Internet.
If you don’t have any Android or iOS device then you can install a desktop app to configure the Chromecast dongle.
My Experience
Even though my TV is a smart one, means I can connect to my Wi-Fi. But browsing sites or watching YouTube is bit difficult with the aide of that remote control. With Chromecast I can browse any site in my computer and if required just cast it to my TV. That means my TV can show any Chrome tab from my computer, if it has photo, video or text. Even I can do multitasking when I am casting a tab to TV, that means my son can watch his favorite video from YouTube running in one of the chrome tab and casted to TV, mean while I can browse Facebook in another tab and is available only to my computer.
One thing I really missing in Chromecast is streaming the videos or music I stored locally in my computer. I am not sure why Google is not provided any option to stream local videos as it’s a very important feature for an awesome device like Chromecast. Hope in future Google will come up with a desktop app to stream local videos.
Not for you, If
- you are looking to stream local videos.
- you have no Wifi device.
- your TV have no HDMI slot.
Camera360 v1.5 released for WP8 with Double Exposure
Camera360 is always one of my favorite camera app in WP8. Let’s see what’s new in this release
- Double-Exposure (new feature).
- Thumbnails loading is faster.
- Photo saving failed bug is fixed.
- ‘Sweet’ filter bug in Portrait is fixed.
Except the first one rest all are bug fixes and performance improvements. Let’s look at the Double exposure in little more detail.
Till this moment I didn’t have much clue about what’s Double Exposure and how to do it. So I searched and come across this site that shows the photos created using Double exposure, It’s really amazing. I turned on Camera360 to see how Double exposure works, at first I didn’t know how to get it working. After playing with Camera360 for a minute or so, I got how to do it. it’s very simple
-
Open Camera360
-
Push the Camera icon up (the icon sits in the center of the dial) . It will give two options Effects and Double Exposure.
-
Choose Double exposure and click the back button, a circle icon below the options. It will take you back to the shooting mode.
-
Point the camera to an object and shoot the first photo, next point the camera to a different object and take a shot.
-
Camera360 will merge these two shots and give you a single photograph. The real good feature is, while taking the second exposure, Camera360 will show a transparent preview of the first exposure. So that you easily know where to place the second object with respect to the first one.
Let me know how it worked for you. Also please share your double exposure photos, you can add the URL in the comment section. If you haven’t downloaded Camera360 go to Windows store and get it.
Happy clicking…
|
|
 |

RiouxSVN–Free private repository with awesome upgrade model
I was looking for a free private repository to host one of my pet project. I knew about Assembla and used it before. Free version of Assembla provides one Repository with 500 mb and three users to a repo. The main limitation here is the team size, it’s limited to 3 members per repo. In future I might want to add my friends to have a look into the code or contribute to it and this limitation in the team will be an issue. So I started looking for other providers that give free repository with a little more team size.
My search leads to RiouxSVN, a place where we can host free repositories and unlimited team size. RiouxSVN provides 50 mb free and four repo slot by default. You can easily add more disk space or number of repositories by purchasing credits.
So what’s a credit, each dollar you donate will earn a credit, yes its as simple as that. Each credit you earn is lifelong, for e.g. if you donate 1 dollar you can redeem 10 mb space. This 10mb space is life long, you don’t have to renew or pay every month or year. Awesome, I love this model, I pay for the space that I want to use and only once. To see more details go to the ‘Plan’ tab in the home page, for easy access I copied it below.
We only have one plan, the free plan, which includes:
- 50 MB per Repository
- 4 Repository Slots per account
- Unlimited users per Repository
Need more? Here is the deal:
- Extra Repository Storage: 1 credit per 10 MB
- Extra Repository Slots: 2 credits per Slot
What’s that credit thing?
Each dollar donated earns you 1 credit
There is another advantage is, you can retrieve your repository upgrade credits by deleting that repository. For e.g. I spend 2 credits to add one more repo to my account, later I decided to remove it for some xyz reason. When you delete that repo you will get that 2 credits back you spent on that repo, with that credit you can buy some more space or can buy another repo. It’s really cool isn’t it.
RiouxSVN will not provide an option to view your source code online. I don’t find it as a limitation as I rarely see my source code online. I use svn client to download my code to my computer and use it.
In my opinion RiouxSVN is one of the best SVN provider to host private repositories. The main selling point for me is it’s affordable flexible upgrade model. Try it your self and let me know your experience in comment section.
Happy coding…
Camera360 – Audio Camera
Camera360 is one of the popular camera app in WP8, iOS and Android. One of the greatest feature of Camera360 is applying filters in real time. Also it has an awesome simple user interface. A new feature added to this camera app is Audio capturing along with the photo. It is available to download from Google Play and The App Store. As of now no audio camera support for Windows Phone8, hope it will be added in the future release.
The Audio Camera tool will help add to all the emotion and drama that is captured using the Camera360 app. The new feature enables users to record and collect the final 5 seconds of sound before a picture is taken and save it along with the image. To prevent additional audio files being saved alongside the actual photo, everything is compacted into one JPEG file saving plenty of space and memory on the smartphone or tablet.
By capturing these few seconds of sounds, it will enable users to capture the essence and emotions of a moment that can be remembered for eternity. This is explained by Camera360 president Hao Xu who said that
with the launch of Audio Camera, Camera360 will help you truly restore the moment and emotions of precious occasions such as when your girlfriend says ‘Yes, I do!’ at that magic moment and also when your classmates says ‘Cheese’ when you graduated from university.
Despite the introduction of Audio Camera, users can still use the Camera360 app to share all their favourite moments with the world with just one or two clicks. As both the image and sound can be found in just the one file, the audio photo can be uploaded directly from Camera360 to social media sites such as Facebook, Twitter and Flickr and shared with friends and family. For those wanting a safe place to store all their pictures, they can also head to www.camera360.com/cloud where users can store pictures and build up a collection of to depict all of someone’s social and personal highlights.
How to Share Audio photo via Social Networks
To share the audio photo to social networks, go to Camera360 settings –> Share settings then authorize Camera360 with Flickr, Facebook, Twitter, etc. After you successfully binded, open the photo in Camera360 explorer by clicking the square (with the last photo taken) on your bottom left hand side. From the photo explorer, click and open the photo with audio, once the photo is open you can see a Share button. Click the share button and share it with your friends.
Your friends can see the photo in the social networks with a link as shown below.


when the user click on the link it will redirects to Camera360 page and can hear the audio embedded in the photo.

Give it a try and leave a comment about how you all feel about Camera360.
Happy clicking…
Camera360 crossed 100 million global users
I started spending more time in mobile photography after I bought my Lumia 920. I experimented with different photography app and one day I saw Camera360 in the store and thought of giving it a try. Then onwards I was in love with Camera360. One reason I was so impressed is it’s simplicity and applying different filters in real time, the big plus factor is, yes it’s free (If it was not free then I will definitely buy it). I would say I become a big fan of Camera360, have a look at some of the photos taken using Lumia920 and for most of the shots I used Camera360.
Recently I came to know that Camera360 crossed 100 million users across iOS, Android and Windows Phone. It’s a big win for Camera360, it’s the first mobile photography app that crossed 100 million users around the world. Check out the press release here.
To my fellow mobile photographers, don’t forget to try Camera360 and please leave your experience with me in the comment section.
Happy clicking…
WP8 Messaging app is not just for Texting
We all are familiar with Text Messaging application, for sending and receiving text messages. But the messaging app introduced in Windows phone is more than just sending or receiving SMS, it’s integrated with Messenger and Facebook. It’s a big shift from the conventional messaging app we see in other smart phones. In other smart phones we need dedicated app for Facebook or messenger chat. iPhone has this chat feature but you have to manually add the FB chat or gtalk service to contact by contact. I think it’s cumbersome for me might not for others.
So how do we manage communications happened via texting or chat? The threads tab in Messaging will show the aggregate of messages sent or received via SMS, Facebook or Messenger chat of a contact. In each message thread, we can switch to chat or texting before sending the message. Say there is a FB chat thread with my wife and I wanted to send her a SMS, I can easily switch to texting using the switch button at the bottom of the thread. It’s a wonderful feature, I can see all the communication between my friend via Facebook chat or texting in the same location. I don’t need to switch between a chat app and messaging to see all the communications.
 |
 |
 |
 |
To enable Facebook chatting, we need to enable that in the settings window, by default it’s turned off. It seems Messaging app is kind of a pluggable architecture and Microsoft can add more clients for well known chat apps like gtalk or skype easily. Let’s hope in future via an update we will get more chat clients.
Happy texting or chatting…
My Favorite Photo editors in Windows Phone 8
Every photographer knows that post processing is as important as taking photos. It started from film age and still continues in digital age. I am no different, I do post processing of photos I shot using my DSLR. One thing I am always clear is, I will never alter the composition by adding extra object that’s not part of the initial photo. In my post processing I deal with saturation and blackness, also based on the photo I will apply prebuilt effects like grayscale, vintage, lomography, etc.
One of the biggest advantage of mobile photography is I don’t want to wait till I get back home for doing my processing. I can photograph it and instantly do my processing and can share it with my friends within no time. One of the challenge in editing is finding the right tool, in this post I will explain some of the photo editors I use to do the post processing in my Lumia 920.
All the editor I mentioned below will overwrite the EXIF info of the photo. I think EXIF is really required and the editors should not overwrite it.
Thumba Photo Editor
Thumba Photo Editor is a paid app, a trial version is also available to experiment the functionalities of the app, but we can’t save the photos. I feel it’s worth for the money If you are serious about post processing, so I bought this app.
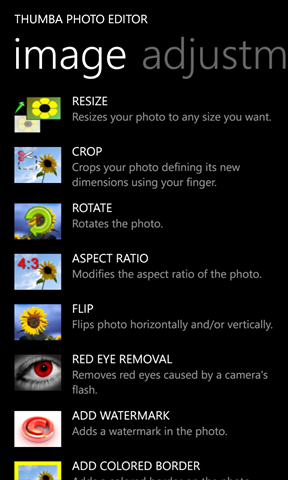
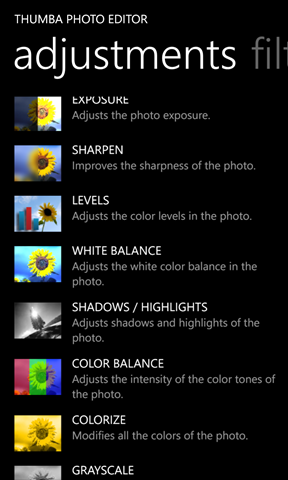
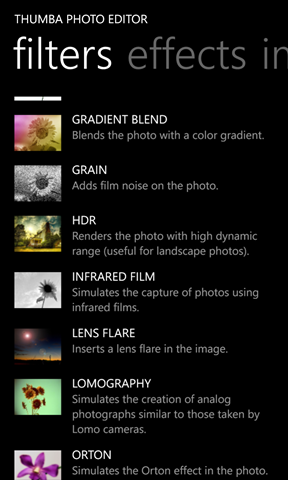
In Thumba editor, editing functionalities are categorized into Image, Adjustments, Filters and Effects. All the functionality in each category have an inline description as well.
In the Image tab you can see options to Crop, Resize, Red eye removal, adding border etc. In adjustments tab we can find options to adjust Exposure, Saturation, White balance, etc. In Filters tab we can see a list of prebuilt effects like Vintage, Vignette, Lomography, etc. In the Effects tab we can see options for converting image to Oil paint, Night vision, Mosaic, etc, I don’t really use this tab.
One feature I badly need is applying different types of Borders. In Thumba we can apply a plain border in different colors. For applying different borders I use Lomogram.
 |
 |
 |
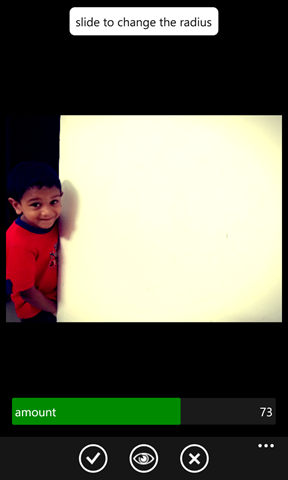 |
As part of initial setup we need to change the picture quality settings, other wise Thumba will compress the image and will loose the quality. To change the setting go to Settings->Photo and choose desired JEPG quality. I set it to 100.
Fantasia Painter
Fantasia Painter has a free and paid version. In free version you will get all the features but with Advertisements. Fantasia also provides a lot of features like what I get in Thumba. One of the great feature of Fantasia is it’s Brush. Using Brush functionality you can do Smudging, Lighten or Darken the photos by brushing on top of the image, Erasing the brush strokes and a lot. This painting feature is not available in Thumba editor.
Another great feature of Fantasia is you can choose different supported effects and add or reduce that effect by customizing it. I love this customization feature as well.
 |
 |
 |
 |
As part of initial setup we need to change the JPEG quality, other wise Fantasia will compress the image and will lose the quality. To change the JPEG quality, go to settings and choose the desired quality. To get the settings screen, click on Open/Save button and on the top bar you can see the settings button.
Lomogram
Lomogram is a light weight editing app with filters similar to Instagram. It’s pretty simple to use and free. We can apply Filters, Lighting effects and Border as well as Crop photo. It has 42 filter, 72 Lighting effects, 49 borders (I didn’t count, copied it from app store). I love this tool because of it’s vast collection of Borders. If you want high quality image, change the Ouput quality to high in settings tab, by default it set to medium.
 |
 |
 |
 |
Edit
One issue with Lomogram is, it reduces the picture size. I sent a mail to the developers of Lomogram detailing this problem and below is the reply I got from them.
Thanks for your feedback! Unfortunately, there are two reasons why Lomogram reduces the image size.
1) Current Version has an issue. Maximum image dimensions should be 1200×1200 but they are 1024×768.
2) Lomogram is not yet optimized for high performance devices like Lumia 920 (or 820), so we are reducing image size to decrease "filtering" time (most of filters are making lots of computations)But we will fix that in future updates 🙂
So if you need a high quality image better stay away from Lomogram until an update that fix the image size issue.
Fotor
Fotor is a simple but elegant photo editing apps like Lomogram. It has features just like Lomogram like Cropping, Filters. One extra feature in Fotor that doesn’t exist in other apps is Tilt-Shift. With Tilt-Shift you can give focus to a specific area rest and will be blured.
 |
 |
 |
 |
Summary
Both Fantasia and Thumba has great photo editing capabilities. Before you invest in the app try it out first and see whether it meets your expectation. I used Lomogram for applying Borders. Taking photos comes first then editing, so invest in a good camera app, see my other post about my favorite Camera apps.
My favorite camera apps for Windows phone 8
I never enjoyed mobile photography before but now I really enjoying after I bought my Lumia 920. It’s a perfect mobile camera with low light imaging capability. Initially I started experimenting with the default Lens app provided with the WP8. But controlling different parameters like Whitebalance, Exposure compensation, Exposure, etc was a bit difficult. So I started searching for better camera apps and I tried different camera apps. In this post I will explain two camera apps that I fell in love with and used it in my day today life, ProShot and Camera 360.
ProShot
I stumble upon ProShot two weeks ago. First I tried the trial version and bought the paid version the same day. It’s a wonderful camera app with good control on your camera settings. Lumia 920 has a 26mm lens with f/2.0 fixed aperture so we can take shot only in Aperture priority mode, so you can only control Shutter not the aperture. That means I wanted the ability to control the shutter speed, exposure compensation, etc. With Proshot I can easily control all these required settings and the settings are easily available from the screen itself. I don’t need to go into any settings screen to change it.
  |
  |
Some of the settings I can control is
- Shutter Speed
- ISO
- White Balance
- Exposure Compensation
- Focus
- Flash
- Aspect Ratio
- AF Assist Lamp
- Grid Lines
- 3D Level Gauge
- Histogram
- Burst Shot (up to 5 FPS)
- Self-Timer
- Intervalometer (for timelapse)
Available Modes
In ProShot mainly three modes available Auto, Programmed and Manual. Most of the time I use Programmed or Manual mode.
I use Program mode to shot my naughty son 🙂 as I don’t get time to adjust the exposure when he runs around. So I let the camera to decide the exposure. I think apart from Exposure all other settings available in Programmed mode.
In Manual mode I have full control of exposure and all other settings. One feature I am missing in mobile photography is light metering. I am not sure whether it’s possible. It will be a big gain if I get it, so I can easily decide what exposure I should set. Other wise I have to experiment with different exposure for a scene and choose a perfect one. So it’s a trial and error method.
Note: If any one has better way of choosing exposure in manual mode, please update it in the comment section.
Grid Lines
By default Grid lines are turned off. We have several uses of grid lines. One I felt is help to apply rule of third. You can find more use with it.
I am not going into the details of other settings and features. If you own a DSLR probably you might have used those settings and very well aware of it.
Camera360
Camera360 is a very simple to use camera app, with great user interface. With Camera360 I cannot control exposure or other advanced settings but it has several prebuilt Programmed modes like Macro, scenery, Portrait, Night and Auto. All the different modes can be selected just by rotating the selection wheel. Also I can apply different effects by swiping the screen and I can see the effects in real time. With this real time preview of effects I don’t need to visualize it, I can see it in action.
Camera 360 comes with photo editing capabilities. In editing mode you can try applying different effects to the photo and decide which one to apply. That gives us more freedom while shooting, shot using any of the available programmed mode with any or default effect, later using edit mode change the effects. So no need to worry about effects and I wont miss my precious moments.
App also have a Photo calendar where I can see the photos in date wise. I would say the Photo Calendar UI is great.
 |
 |
 |
 |
Summary
In my opinion with these two cameras apps I can take great photos. Also Windows phone store has some great apps specifically for photo editing. With these camera apps and Photo editors my mobile can be used as a camera and a post production machine. I don’t need to get back to my laptop for post processing. I shot it, process it, share it.
In my next post I will tell my favorite Photo editor apps. Mean while have a look at some my photos taken using my Lumia 920.
Happy clicking and let me know your favorite camera apps for Windows Phone 8.
My Windows Phone 8 experience with Lumia 920
 |
I moved to Lumia 920 a month ago from iPhone. I felt like I did a good decision of choosing Windows Phone 8, especially Lumia 920. Nokia Lumia 920 is an awesome phone with superior built quality. WP8 got a fresh new look with live tiles. I got really bored with the icon interface I deal every day in my iPhone or Android tab. In this post I will go through the features I feel very important to me in Lumia 920 WP8 Phone. |
People hub
People hub in Windows Phone is not just an address book, it’s integrated with Facebook, LinkedIn, Twitter, etc. I can see my friends Twitter or Facebook updates just looking at the ‘What’s new’ tab. Some times I might lost in the updates from so many friends and miss updates from my close friends or family members. To overcome that I can categorize my contacts as groups and see the updates only from the contacts belongs to that group. For e.g. I have a family group where all my family members added to it, that way I don’t miss any update from my wife or little sister or bro.
Another important feature is I can write to the Facebook wall of my contact directly from the People hub, I don’t need any Facebook client. Just select the contact and tap Write on wall and enter what ever I need to post. Same way I can tweet to my contact from People hub.
 |
 |
 |
Photos Hub
Photos hub is the place I can see all the photos taken using my phone, as well as the photos I uploaded to Facebook albums and sky drive. It’s a great feature for me, I can easily identify which are the photos I need to upload to Facebook. Another feature I like is syncing the photos I uploaded to Facebook from my tab or laptop with my phone. Just go to the Photos hub and open the Facebook album then open the photo I wanted offline, from the menu select ‘save to phone’, done, I can see the photo in Saved picture album/folder.
I can also see the latest Photos from my friends by just going to ‘what’s new’ tab. I don’t need any third party apps, it’s all built in.
I really care for my photos and wanted to backup regularly. With built in Skydrive integration I can directly upload it to Skydrive, no need to wait till I get back home to sync with my Laptop. Also I feel more secured syncing to skydrive, because my laptop can crash any time but skydrive won’t.
 |
 |
 |
Music Hub
The Music + Videos Hub is where I can play and manage my music. I use Winows Phone app to sync my music. The biggest advantage of Windows Phone app is, it can sync playlist from iTunes or Media player list. I prefer iTunes sync as I organized my music library in iTunes and I cant afford reorganizing it again.
One of the feature I like in Winows phone 8 Email client is, the consistency in the user interface. I configured my two gmail accounts, my MS account and my office exchange email. All the mail client behave the same consistent manner and I really like that consistency. I have an Android tab and it has two email clients one from google and another one for exchange mails. Both has different type of interface and need different type of user interaction, It’s a pain.
Another feature I feel very important is linking inbox, means I can link different email accounts and show it in single inbox.
Calendar
I like that Calendar tile pinned to my home even though the Calendar app’s look and feel is not that great. But it does it’s job very well. My calendar is synced with my office exchange mail, facebook events and birthdays, gmail events, etc. It’s really help me to keep track of my schedules. Most importantly I don’t miss any of my friends birthdays 🙂 as it synced with Facebook birthdays.
Camera
My passionate hobby is Photography and I own a DLSR. But carrying my camera every where is difficult and my Lumia 920 solves it. Lumia 920 has an awesome camera and is capable of taking low light shots. In DSLR 99% of the time I shot without flash and Lumia 920’s low light imaging capability helps me to shot without flash. You can find a great review of Lumia 920 Camera in wpcentral. I also have a great control on other setting like Whitebalance, exposure compensation, focusing, etc. I feel like I got every control I need for a better shot except the light metering :). To get full control of your camera you need to buy app like Proshot, it’s topic for another post.
You can find the photos taken using Lumia920 in my flickr set, don’t forget to leave your comments :). Some of the photos I shot using Lumia 920.
 |
  |
App store
I could find all the apps I regularly use in my iPhone or android. Check it out yourself.
What I need
Dialer: I wonder why WP8 is not equipped with a dialer like Rapdialer (not expecting all features). I like the idea of pinning contacts or groups to home but I really don’t want to clutter my home screen with so many tiles. To ease my calling experience I bought RapDialer app. What I really wanted is a favorite contacts and should be able to access it from the default dialer, like the one available in iPhone.
Close Apps from Task switching window: I can see all the apps opened by doing a long press of the Back button. But it will be good if I can able to close it manually from the task switching window. I am not sure whether it’s achievable.
GitHub for Windows
Recently GitHub launched a new Github client for windows. The moment I heard the news I installed the client to give a try. I could say the new Github for windows is really awesome and easy to use. See the screen shot of the client.

The important feature is, the moment you sign in with Windows client it creates a security token and updates it in Github. With the previous client it’s a headache, I screwed up the setup procedures so many times. To setup Git GUI run the command utility to create the security token, then manually update the key in you Github account, add your repo path, the procedures goes on….. In windows Client, it’s as simple as just login with your Github account and the client takes care of every thing else.
Once you logged in, click on the Github User Name and the client will show all your Github repositories. You can easily clone any repository to local by just clicking on the clone icon that will appear in mouse hover as shown below.

Before cloning make sure you update the Default storage directory. You can find the location under Tools and Options –> Options as shown below

The options menu brings up the below screen where you can update the settings

Update your default storage directory and click Update button, we are done with the settings. Let’s clone your repository, I already clone Neo4jD repo. Let’s see how to deal with commit and push actions using Windows client.
You can find all your cloned repo under local repositories. For demo I made a small change in the unit test. To perform the commit action in Windows Client, click on the arrow that shows next to your repo name as shown below

Will take you to the repo page where you can see all your changes and history as shown below. Left side display all the files to be commited and right side shows the commit comment and commit history.

If you want to see what changed in the source, click the arrow button next to changed file (marked in red rectangle above). You can see the changes just below it as shown below.

You can even discard the changes from commit by right clicking on the item and select Discard Changes from the context menu.
It’s the time to commit the changes, enter the commit comment in Commit Message text box displayed on the right hand side and click Commit button. See the below screen shot

Clicking on the History item will show the changes as part of that commit. Let’s see the history of the commit I made yesterday. You can see all the files modified as part of that commit and can see the changes by clicking the down arrow next the each item.

Another feature added to GitHub web is an addition of a button called ‘Clone in Windows’ as shown below. This helps to clone any repo directly from GitHub, and it uses the installed GitHub for Windows client to full fill the cloning.

I can say GitHub for Windows is a very user friendly client and I don’t think I will go back to GitGUI again.

