StaleStateException for Entity with Assigned Id and version in NHibernate
I was trying to persist an entity using NHibernate that uses Assigned Id’s and Version concurrency mechanism. Every time I try to persist a new instance, I am getting a StaleStateException. As per my knowledge the concurrency check will happen when we try to do an update, in my scenario it’s throwing while doing an insert. Also in the nhibernate log, I could see nhiberate is firing update command instead of insert.
After doing some googling I come across a stackoverflow post, that NHibernate will fire update or insert based on three parameters.
-
Id
-
Version
-
Timestamp
In my case Id is assigned and it will exist even if it’s a new data and I can’t help it. I am not using Timestamp. So the issue narrowed down to Version. Entity do have a version and unfortunately it’s updated using Automapper, while converting DTO to Entity. I use unix timestamp as version and we added a custom mapping in automapper to fill current date in unix timestamp format if version field is coming as empty from the client and is useful in update scenario. So for NHibernate this is not a new data because it has Id and version, so it will try to do an update instead of insert and that causes all the issues for me.
To solve this issue, either we can use Save() instead of SaveOrUpdate() or set version to zero for new data.
WP8 Messaging app is not just for Texting
We all are familiar with Text Messaging application, for sending and receiving text messages. But the messaging app introduced in Windows phone is more than just sending or receiving SMS, it’s integrated with Messenger and Facebook. It’s a big shift from the conventional messaging app we see in other smart phones. In other smart phones we need dedicated app for Facebook or messenger chat. iPhone has this chat feature but you have to manually add the FB chat or gtalk service to contact by contact. I think it’s cumbersome for me might not for others.
So how do we manage communications happened via texting or chat? The threads tab in Messaging will show the aggregate of messages sent or received via SMS, Facebook or Messenger chat of a contact. In each message thread, we can switch to chat or texting before sending the message. Say there is a FB chat thread with my wife and I wanted to send her a SMS, I can easily switch to texting using the switch button at the bottom of the thread. It’s a wonderful feature, I can see all the communication between my friend via Facebook chat or texting in the same location. I don’t need to switch between a chat app and messaging to see all the communications.
 |
 |
 |
 |
To enable Facebook chatting, we need to enable that in the settings window, by default it’s turned off. It seems Messaging app is kind of a pluggable architecture and Microsoft can add more clients for well known chat apps like gtalk or skype easily. Let’s hope in future via an update we will get more chat clients.
Happy texting or chatting…
My Favorite Photo editors in Windows Phone 8
Every photographer knows that post processing is as important as taking photos. It started from film age and still continues in digital age. I am no different, I do post processing of photos I shot using my DSLR. One thing I am always clear is, I will never alter the composition by adding extra object that’s not part of the initial photo. In my post processing I deal with saturation and blackness, also based on the photo I will apply prebuilt effects like grayscale, vintage, lomography, etc.
One of the biggest advantage of mobile photography is I don’t want to wait till I get back home for doing my processing. I can photograph it and instantly do my processing and can share it with my friends within no time. One of the challenge in editing is finding the right tool, in this post I will explain some of the photo editors I use to do the post processing in my Lumia 920.
All the editor I mentioned below will overwrite the EXIF info of the photo. I think EXIF is really required and the editors should not overwrite it.
Thumba Photo Editor
Thumba Photo Editor is a paid app, a trial version is also available to experiment the functionalities of the app, but we can’t save the photos. I feel it’s worth for the money If you are serious about post processing, so I bought this app.
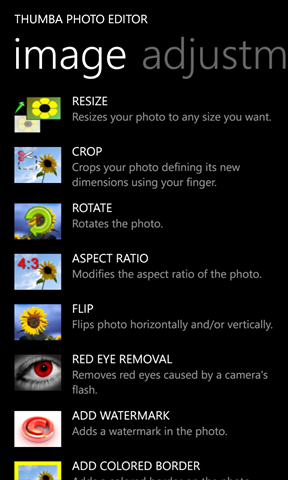
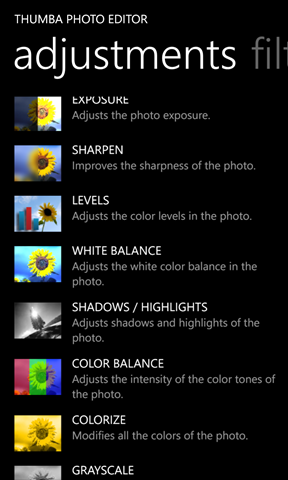
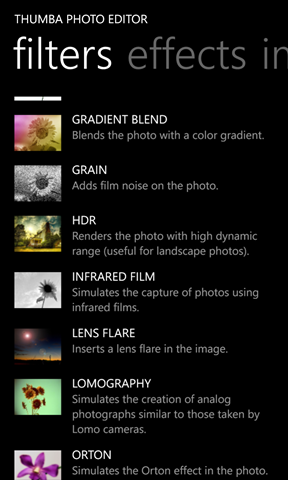
In Thumba editor, editing functionalities are categorized into Image, Adjustments, Filters and Effects. All the functionality in each category have an inline description as well.
In the Image tab you can see options to Crop, Resize, Red eye removal, adding border etc. In adjustments tab we can find options to adjust Exposure, Saturation, White balance, etc. In Filters tab we can see a list of prebuilt effects like Vintage, Vignette, Lomography, etc. In the Effects tab we can see options for converting image to Oil paint, Night vision, Mosaic, etc, I don’t really use this tab.
One feature I badly need is applying different types of Borders. In Thumba we can apply a plain border in different colors. For applying different borders I use Lomogram.
 |
 |
 |
 |
As part of initial setup we need to change the picture quality settings, other wise Thumba will compress the image and will loose the quality. To change the setting go to Settings->Photo and choose desired JEPG quality. I set it to 100.
Fantasia Painter
Fantasia Painter has a free and paid version. In free version you will get all the features but with Advertisements. Fantasia also provides a lot of features like what I get in Thumba. One of the great feature of Fantasia is it’s Brush. Using Brush functionality you can do Smudging, Lighten or Darken the photos by brushing on top of the image, Erasing the brush strokes and a lot. This painting feature is not available in Thumba editor.
Another great feature of Fantasia is you can choose different supported effects and add or reduce that effect by customizing it. I love this customization feature as well.
 |
 |
 |
 |
As part of initial setup we need to change the JPEG quality, other wise Fantasia will compress the image and will lose the quality. To change the JPEG quality, go to settings and choose the desired quality. To get the settings screen, click on Open/Save button and on the top bar you can see the settings button.
Lomogram
Lomogram is a light weight editing app with filters similar to Instagram. It’s pretty simple to use and free. We can apply Filters, Lighting effects and Border as well as Crop photo. It has 42 filter, 72 Lighting effects, 49 borders (I didn’t count, copied it from app store). I love this tool because of it’s vast collection of Borders. If you want high quality image, change the Ouput quality to high in settings tab, by default it set to medium.
 |
 |
 |
 |
Edit
One issue with Lomogram is, it reduces the picture size. I sent a mail to the developers of Lomogram detailing this problem and below is the reply I got from them.
Thanks for your feedback! Unfortunately, there are two reasons why Lomogram reduces the image size.
1) Current Version has an issue. Maximum image dimensions should be 1200×1200 but they are 1024×768.
2) Lomogram is not yet optimized for high performance devices like Lumia 920 (or 820), so we are reducing image size to decrease "filtering" time (most of filters are making lots of computations)But we will fix that in future updates 🙂
So if you need a high quality image better stay away from Lomogram until an update that fix the image size issue.
Fotor
Fotor is a simple but elegant photo editing apps like Lomogram. It has features just like Lomogram like Cropping, Filters. One extra feature in Fotor that doesn’t exist in other apps is Tilt-Shift. With Tilt-Shift you can give focus to a specific area rest and will be blured.
 |
 |
 |
 |
Summary
Both Fantasia and Thumba has great photo editing capabilities. Before you invest in the app try it out first and see whether it meets your expectation. I used Lomogram for applying Borders. Taking photos comes first then editing, so invest in a good camera app, see my other post about my favorite Camera apps.
My favorite camera apps for Windows phone 8
I never enjoyed mobile photography before but now I really enjoying after I bought my Lumia 920. It’s a perfect mobile camera with low light imaging capability. Initially I started experimenting with the default Lens app provided with the WP8. But controlling different parameters like Whitebalance, Exposure compensation, Exposure, etc was a bit difficult. So I started searching for better camera apps and I tried different camera apps. In this post I will explain two camera apps that I fell in love with and used it in my day today life, ProShot and Camera 360.
ProShot
I stumble upon ProShot two weeks ago. First I tried the trial version and bought the paid version the same day. It’s a wonderful camera app with good control on your camera settings. Lumia 920 has a 26mm lens with f/2.0 fixed aperture so we can take shot only in Aperture priority mode, so you can only control Shutter not the aperture. That means I wanted the ability to control the shutter speed, exposure compensation, etc. With Proshot I can easily control all these required settings and the settings are easily available from the screen itself. I don’t need to go into any settings screen to change it.
  |
  |
Some of the settings I can control is
- Shutter Speed
- ISO
- White Balance
- Exposure Compensation
- Focus
- Flash
- Aspect Ratio
- AF Assist Lamp
- Grid Lines
- 3D Level Gauge
- Histogram
- Burst Shot (up to 5 FPS)
- Self-Timer
- Intervalometer (for timelapse)
Available Modes
In ProShot mainly three modes available Auto, Programmed and Manual. Most of the time I use Programmed or Manual mode.
I use Program mode to shot my naughty son 🙂 as I don’t get time to adjust the exposure when he runs around. So I let the camera to decide the exposure. I think apart from Exposure all other settings available in Programmed mode.
In Manual mode I have full control of exposure and all other settings. One feature I am missing in mobile photography is light metering. I am not sure whether it’s possible. It will be a big gain if I get it, so I can easily decide what exposure I should set. Other wise I have to experiment with different exposure for a scene and choose a perfect one. So it’s a trial and error method.
Note: If any one has better way of choosing exposure in manual mode, please update it in the comment section.
Grid Lines
By default Grid lines are turned off. We have several uses of grid lines. One I felt is help to apply rule of third. You can find more use with it.
I am not going into the details of other settings and features. If you own a DSLR probably you might have used those settings and very well aware of it.
Camera360
Camera360 is a very simple to use camera app, with great user interface. With Camera360 I cannot control exposure or other advanced settings but it has several prebuilt Programmed modes like Macro, scenery, Portrait, Night and Auto. All the different modes can be selected just by rotating the selection wheel. Also I can apply different effects by swiping the screen and I can see the effects in real time. With this real time preview of effects I don’t need to visualize it, I can see it in action.
Camera 360 comes with photo editing capabilities. In editing mode you can try applying different effects to the photo and decide which one to apply. That gives us more freedom while shooting, shot using any of the available programmed mode with any or default effect, later using edit mode change the effects. So no need to worry about effects and I wont miss my precious moments.
App also have a Photo calendar where I can see the photos in date wise. I would say the Photo Calendar UI is great.
 |
 |
 |
 |
Summary
In my opinion with these two cameras apps I can take great photos. Also Windows phone store has some great apps specifically for photo editing. With these camera apps and Photo editors my mobile can be used as a camera and a post production machine. I don’t need to get back to my laptop for post processing. I shot it, process it, share it.
In my next post I will tell my favorite Photo editor apps. Mean while have a look at some my photos taken using my Lumia 920.
Happy clicking and let me know your favorite camera apps for Windows Phone 8.
My Windows Phone 8 experience with Lumia 920
 |
I moved to Lumia 920 a month ago from iPhone. I felt like I did a good decision of choosing Windows Phone 8, especially Lumia 920. Nokia Lumia 920 is an awesome phone with superior built quality. WP8 got a fresh new look with live tiles. I got really bored with the icon interface I deal every day in my iPhone or Android tab. In this post I will go through the features I feel very important to me in Lumia 920 WP8 Phone. |
People hub
People hub in Windows Phone is not just an address book, it’s integrated with Facebook, LinkedIn, Twitter, etc. I can see my friends Twitter or Facebook updates just looking at the ‘What’s new’ tab. Some times I might lost in the updates from so many friends and miss updates from my close friends or family members. To overcome that I can categorize my contacts as groups and see the updates only from the contacts belongs to that group. For e.g. I have a family group where all my family members added to it, that way I don’t miss any update from my wife or little sister or bro.
Another important feature is I can write to the Facebook wall of my contact directly from the People hub, I don’t need any Facebook client. Just select the contact and tap Write on wall and enter what ever I need to post. Same way I can tweet to my contact from People hub.
 |
 |
 |
Photos Hub
Photos hub is the place I can see all the photos taken using my phone, as well as the photos I uploaded to Facebook albums and sky drive. It’s a great feature for me, I can easily identify which are the photos I need to upload to Facebook. Another feature I like is syncing the photos I uploaded to Facebook from my tab or laptop with my phone. Just go to the Photos hub and open the Facebook album then open the photo I wanted offline, from the menu select ‘save to phone’, done, I can see the photo in Saved picture album/folder.
I can also see the latest Photos from my friends by just going to ‘what’s new’ tab. I don’t need any third party apps, it’s all built in.
I really care for my photos and wanted to backup regularly. With built in Skydrive integration I can directly upload it to Skydrive, no need to wait till I get back home to sync with my Laptop. Also I feel more secured syncing to skydrive, because my laptop can crash any time but skydrive won’t.
 |
 |
 |
Music Hub
The Music + Videos Hub is where I can play and manage my music. I use Winows Phone app to sync my music. The biggest advantage of Windows Phone app is, it can sync playlist from iTunes or Media player list. I prefer iTunes sync as I organized my music library in iTunes and I cant afford reorganizing it again.
One of the feature I like in Winows phone 8 Email client is, the consistency in the user interface. I configured my two gmail accounts, my MS account and my office exchange email. All the mail client behave the same consistent manner and I really like that consistency. I have an Android tab and it has two email clients one from google and another one for exchange mails. Both has different type of interface and need different type of user interaction, It’s a pain.
Another feature I feel very important is linking inbox, means I can link different email accounts and show it in single inbox.
Calendar
I like that Calendar tile pinned to my home even though the Calendar app’s look and feel is not that great. But it does it’s job very well. My calendar is synced with my office exchange mail, facebook events and birthdays, gmail events, etc. It’s really help me to keep track of my schedules. Most importantly I don’t miss any of my friends birthdays 🙂 as it synced with Facebook birthdays.
Camera
My passionate hobby is Photography and I own a DLSR. But carrying my camera every where is difficult and my Lumia 920 solves it. Lumia 920 has an awesome camera and is capable of taking low light shots. In DSLR 99% of the time I shot without flash and Lumia 920’s low light imaging capability helps me to shot without flash. You can find a great review of Lumia 920 Camera in wpcentral. I also have a great control on other setting like Whitebalance, exposure compensation, focusing, etc. I feel like I got every control I need for a better shot except the light metering :). To get full control of your camera you need to buy app like Proshot, it’s topic for another post.
You can find the photos taken using Lumia920 in my flickr set, don’t forget to leave your comments :). Some of the photos I shot using Lumia 920.
 |
  |
App store
I could find all the apps I regularly use in my iPhone or android. Check it out yourself.
What I need
Dialer: I wonder why WP8 is not equipped with a dialer like Rapdialer (not expecting all features). I like the idea of pinning contacts or groups to home but I really don’t want to clutter my home screen with so many tiles. To ease my calling experience I bought RapDialer app. What I really wanted is a favorite contacts and should be able to access it from the default dialer, like the one available in iPhone.
Close Apps from Task switching window: I can see all the apps opened by doing a long press of the Back button. But it will be good if I can able to close it manually from the task switching window. I am not sure whether it’s achievable.
Function returns Entity or DTO
I am working on a project that deals WCF services. In our design we separated Entities and Datacontracts (DTO). The application layer takes care of converting Entities to DTO’s before passing it to Service layer. In the application layer, classes communicates and passes data but I need the inter application layer communication should deals with Entities not DTO’s. So I wanted to find a way so that the function can return Entity or DTO. In this post I will explain how I achieved it, It’s pretty simple.
One option is I could have moved the Entity to DTO mapping to Service layer. I decided not to do it and want to make the service layer light weight.
Another option is shown below.
Let’s take an example of POS system and here we deals with Product. For simplicity I takeout the Interface.
    public class ProductMaintenance
    {
        private Product _currentlyFetchedProduct;

        public ProductMaintenance Get(string productCode)
        {
            //do the logic to fetch product.
            return this;
        }

        public Product ToEntity()
        {
            return _currentlyFetchedProduct;
        }

        public ProductDTO ToDTO()
        {
            //do the logic to map Entity to DTO
            return new ProductDTO();
        }
    }
The Service class will make a call to the ProductMaintenance as shown below
ProductMaintenance productMaintenance = new ProductMaintenance();
return productMaintenance.GetProduct(productCode).ToDTO();
What if the ProductMaintenance class returns more than one type of Data, say it returns Product and List of Product. Then the complexity increases and difficult to handle it.
I introduced a new class to handle this situation called DataGetter, see the code below.
    interface IDataGetter<TSource, TDest>
        where TSource : class
        where TDest : class
    {
        TDest ToDTO();
        TSource ToEntity();
    }
    public class DataGetter<TSource, TDest> : IDataGetter<TSource,TDest>
        where TSource:class
        where TDest:class
    {
        private TSource _entity;
        public DataGetter(TSource entity)
        {
            this._entity = entity;
        }

        public TSource ToEntity()
        {
            return _entity;
        }

        public TDest ToDTO()
        {
            //Do the logic to convert entity to DTO
            return null;
        }
    }
Let’s rewrite the ProductMaintenance class with the new DataGetter.
        public IDataGetter<Product, ProductDTO> GetProduct(string productCode)
        {
            Product productFetched = Repository.GetProduct(productCode);
            return new DataGetter<Product, ProductDTO>(productFetched);
        }

        public IDataGetter<IList<Product>, IList<ProductDTO>> GetAll()
        {
            IList<Product> products = Repository.GetAllProducts();
            return new DataGetter<IList<Product>, IList<ProductDTO>>(products);
        }
The service can call the ProductMaintenance as shown below.
        public ProductDTO GetProduct(string productCode)
        {
            ProductMaintenance productMaintenance = new ProductMaintenance();
            return productMaintenance.GetProduct(productCode).ToDTO();
        }

        public IList<ProductDTO> GetAllProducts()
        {
            ProductMaintenance productMaintenance = new ProductMaintenance();
            return productMaintenance.GetAll().ToDTO();
        }
How to call ProductMaintenance from the same layer, that time we need to deal with Entity instead of DTO. We can easily do that by calling the same function chain with ToEntity() as shown below.
ProductMaintenance productMaintenance = new ProductMaintenance();
return productMaintenance.GetAll().ToEntity();
Another advantage of DataGetter is, we can abstract the Entity to DTO mapping from the application class. So any changes to the mapping provider can be done in a single place. For Entity mapping I use AutoMapper.
Word of Caution
If we are using any ORM with Lazy loading then make sure the repository session is opened till ToDTO or ToEntity call completes. Say for e.g. if we create the session in GetProduct and close the session in the finally, then ToDTO or ToEntity will throw error as the session is closed and unable to do Lazy loading. I use Castle Windsor to inject the repository dependencies and the session will get closed only in the Dispose function.
NHibernate and Oracle Long Varchar field
I am working on a project to create a webservice on top of a Legacy Oracle db. As usual I used NHibernate as the ORM. Every thing is working as expected until I hit a table with a field type of ‘Long’. NHibernate freezes whenever it try to insert records to this table. NHibernate logging was enabled and I could see no action is taking place after issuing the Insert command to this table. So to pin point the issue I commented out the filed with LONG type from the hbm mapping. Then I repeated the test, this time insertion went well without any freezing.
I confirmed that the issue is with this particular Oracle Long datatype field. I guessed that parameter type NHibernate set for this filed is the culprit. I explicitly set the type in hbm file and tried many types supported by NHibernate, but in vain. I wasted so much time trying different types in hbm and googling for a solution, at last I decided to come up with a custom type to solve this issue. I got a starting point from a blog post of nforge.
Let’s see the Custom type I created for Oracle Long.
using System;
using System.Data;
using NHibernate.UserTypes;
using NHibernate;
using Oracle.DataAccess.Client;
namespace Net.Infrastructure.Persistence
{
    public class OracleLongVarcharType:IUserType
    {
        private static readonly NHibernate.SqlTypes.SqlType[] SQL_TYPES =
            { NHibernate.NHibernateUtil.StringClob.SqlType };

        public object Assemble(object cached, object owner)
        {
            return owner;
        }

        public object DeepCopy(object value)
        {
            return value;
        }

        public object Disassemble(object value)
        {
            return value;
        }

        public bool Equals(object x, object y)
        {
            if ( object.ReferenceEquals(x,y) ) return true;
            if (x == null || y == null) return false;
            return x.Equals(y);
        }

        public int GetHashCode(object x)
        {
            if (x == null)
                return 0;

            return x.GetHashCode();
        }

        public bool IsMutable
        {
            get { return false; }
        }

        public object NullSafeGet(System.Data.IDataReader rs, string[] names, object owner)
        {
            object obj = NHibernateUtil.String.NullSafeGet(rs, names[0]);
            if (obj == null) return null;
            string val = Convert.ToString(obj);
            return val;
        }

        public void NullSafeSet(System.Data.IDbCommand cmd, object value, int index)
        {
            if (value == null)
                ((IDataParameter)cmd.Parameters[index]).Value = DBNull.Value;
            else
            {
                OracleCommand oraCmd = cmd as OracleCommand;
                if (oraCmd != null)
                {
                    oraCmd.Parameters[index].OracleDbType = Oracle.DataAccess.Client.OracleDbType.Long;
                    oraCmd.Parameters[index].Value = Convert.ToString(value);
                }
                else
                {
                    ((IDataParameter)cmd.Parameters[index]).Value = Convert.ToString(value);
                }

            }
        }

        public object Replace(object original, object target, object owner)
        {
            return original;
        }

        public Type ReturnedType
        {
            get { return typeof(string); }
        }

        public NHibernate.SqlTypes.SqlType[] SqlTypes
        {
            get { return SQL_TYPES; }
        }
    }
}
I don’t think the implementation need much explanation. Pay attention to NullSafeGet and NullSafeSet. In NullSafeSet I cast the IDBCommand to Oracle command, then reassign the parameter type as OracleDbType.Long. That’s it, we created a new custom type to handle Oracle Long type.
Let’s see how to add this new type to the mapping in hbm file.
<property name="TextData" column="TEXT_DATA" not-null="false" access="property"
type="Net.Infrastructure.Persistence.OracleLongVarcharType,Net.Infrastructure.Persistence"/>
The Insert command NHibernate create before adding the custom type is as shown below
INSERT INTO TEXT_STORAGE (TEXT_DATA, CHANGE_DATE, CHANGE_USER, TEXT_NUMBER) VALUES (:p0, :p1, :p2, :p3);:p0 = ‘Purchase order text’ [Type: String], :p1 = 1352287328 [Type: Int64 (0)], :p2 = ‘sarouje’ [Type: String (0)], :p3 = 100588726 [Type: Int64 (0)]
after adding the Custom type
INSERT INTO TEXT_STORAGE (TEXT_DATA, CHANGE_DATE, CHANGE_USER, TEXT_NUMBER) VALUES (:p0, :p1, :p2, :p3);:p0 = ‘Purchase order text’ [Type: String (0)], :p1 = 1352287328 [Type: Int64 (0)], :p2 = ‘sarouje’ [Type: String (0)], :p3 = 100588726 [Type: Int64 (0)]
Update
Once I did some testing I realize that NHibernate is not fetching data from the table with Long type. After some search I came to know that, while creating the Oracle Command we should set InitialLONGFetchSize to a non zero value. By default OracleCommand set InitialLONGFetchSize to zero. If the InitialLONGFetchSize is zero then data retrieval is deferred until that data is explicitly requested by the application. Even I request explicitly nothing is returning. So only option left is set InitialLONGFetchSize to a non zero. Then the question is how will I get the Command to set this property. I researched for Listeners, Interceptors, etc, nothing helped me. So I decided to inherit from OracleDataClientDriver and create my own as shown below.
using NHibernate.Driver;
using Oracle.DataAccess.Client;
namespace Net.Infrastructure.Persistence
{
    public class OracleDriverExtended:OracleDataClientDriver
    {
        public override void AdjustCommand(System.Data.IDbCommand command)
        {
            OracleCommand cmd = command as OracleCommand;
            if (cmd != null)
                cmd.InitialLONGFetchSize = -1;
        }
    }
}
Now we have to instruct NHibernate to use the new driver I created, update the driver info in hibernate.cfg.xml as shown below.
<property name="connection.driver_class">Net.Infrastructure.Persistence.OracleDriverExtended,
Net.Infrastructure.Persistence</property>
I reran the test and now I could see the data from the Long field. Relieved….
Hope this post will help some one. Happy coding.
Meteor as a persistence layer
The idea of considering Meteor as a persistence layer might be crazy. But there is a good reason for doing that, the real time pushing of data to connected clients using Distribute Data Protocol. Then why cant we write the entire application in Meteor including the User interface, yes we can Meteor supports it. But some people have preference or every one might not be comfortable in creating stunning UI in Meteor but good in ASP.NET. So how do we bridge the best of both the worlds. Let’s take a look at it.
Let’s think about an online Cricket score board, what are all the components we might have
-
A score feeder, a deamon that gets the score from a REST Api or a web service and updates to database.
-
A web app that fetches the data and present it to the user.
The issue here is to get the updated score the user needs to refresh the page. What if user gets the data in real time without doing any page refresh. Let’s see how to add these kind of features.
Here the UI will be in ASP.NET and the DDP client library is DDPClient.NET and for real time signalling of data to connected client, we can use SignalR. DDPClient.NET is integrated with SignalR.

Let’s have a look at how DDPClient.NET can be used in this scenario to push data to connected clients. In one of my previous post I explained a bit detail about DDPClient.NET. Recently I added SignalR framework to it to extend DDPClient accessible from any type of application, be it an ASP.NET or Javascript app or Windows Phone or Desktop app that can act as SignalR Client.
Rest of the post we will see how to receive real time updates from Meteor server using DDPClient.NET.
Right now in DDPClient.NET, SignalR uses self hosting approach. Let’s see how to start the DDPClient.NET, for test I hosted it in a console application.
class Program
{
    static void Main(string[] args)
    {
        DDPClientHost host = new DDPClientHost("http://localhost:8081/", "localhost:3000");
        host.Start();
        Console.ReadLine();
    }
}
DDPClientHost take two parameters the first one is, in which URL DDPClient.NET should listen for incoming request, the second one is to specify where Meteor server is running. Then just call the Start function in the DDPClientHost instance. That’s it, now DDPClient.NET is ready to receive incoming request.
ASP.NET Javascript client
Let’s see how to subscribe to a Meteor’s published item from a javascript client.
$(function () {
    var connection = $.hubConnection('http://localhost:8081/');
    proxy = connection.createProxy('DDPStream')
    connection.start()
             .done(function () {
                 proxy.invoke('subscribe', 'allproducts','product');
                 $('#messages').append('<li>invoked subscribe</li>');
             })
             .fail(function () { alert("Could not Connect!"); });


             proxy.on('flush', function (msg) {
                 $('#messages').append('<li>' + msg.prodName + '</li>');
             });

});
Let’s do a quick walkthrough of the code. As you can see
- The hubÇonnection should point to the url where DDPClient.NET is listening.
- The proxy should be created for DDPStream, it’s a SignalR Hub and is mandatory to use the same name.
-
Once the connection started successfully, we should invoke the Subscribe function declared in DDPStream hub with the published item name declared in Meteor. we should also pass the name of the Collection it returns, in this case it returns a collection of Product. If in case the Meteor’s published item name and the collection name is same then we can simply write proxy.invoke(‘subscribe’, ‘product’); You don’t have to pass the collection name’.
See the code below to see how to publish item from Meteor Server.
Meteor.publish("allproducts", function () {
    return Products.find();
});
Products is a Meteor’s collection that returns Product
Products = new Meteor.Collection("product");
-
Also we should have a function called Flush as shown below. This function will called by the DDPStream to send the data to the connected clients.
proxy.on('flush', function (msg) {
    $('#messages').append('<li>' + msg.prodName + '</li>');
});
Desktop/Console Application client
It’s similar to the code shown above but it will in C#. See the code below.
class Program
{
    static void Main(string[] args)
    {
        var hubConnection = new HubConnection("http://localhost:8081/");
        var ddpStream = hubConnection.CreateProxy("DDPStream");
        ddpStream.On("flush", message => System.Console.WriteLine(message.prodName));
        hubConnection.Start().Wait();
        ddpStream.Invoke("Subscribe", "allproducts","product");
        System.Console.Read();
    }
}
That’s it we are done. Now any insert or update of data to the product collection will get notified instantly to all the connected clients. If you run the application you can see the ASP.NET page will show any newly added product without refreshing the page. The DDPClient.NET is still in development.
You can download DDPClient.NET and the example from Github.
Happy coding…
SignalR – Real time pushing of data to connected clients
Updated post about how to create a chat application using SignalR 2.1
How many times you might have refreshed your browser to see the updated score of a cricket match or refresh to get the updated stock details. Isn’t that cool if the browser can display the updated data without refreshing or doing a page load. Yes it is, then the next question come to mind is how to implement it using .NET technology. There is no straight forward approach, most of them have loads of code.
So how do we achieve it? The answer is SignalR. Scott Hanselman have a nice post about SignalR. In his post he explains a small chat application using 12 lines of code.
I wanted a real time pushing of data to ASP.NET, Javascript client or desktop clients for a project I am working on. The details of that project I will post it later. I am aware of SignalR but never really tried or doesn’t know how to make it work. Yesterday I decided to write a tracer to better understand how SignalR works. This post is all about that tracer I created.
Tracer Functionality
The functionality is very simple. I need two clients a console and a web app. Data entered in any of these clients should reflect in other one. A simple functionality to test SignalR.
Let’s go through the implementation.
I have three projects in my solution 1. SignalR self hosted server 2. A console Client 3. A Web application.
SignalR server
Here I used a self hosting option. That means I can host the server in Console or Windows service. Have a look at the code.
using System;
using System.Threading.Tasks;
using SignalR.Hosting.Self;
using SignalR.Hubs;
namespace Net.SignalR.SelfHost
{
    class Program
    {
        static void Main(string[] args)
        {
            string url = "http://localhost:8081/";

            var server = new Server(url);
            server.MapHubs();

            server.Start();
            Console.WriteLine("SignalR server started at " + url);

            while (true)
            {
                ConsoleKeyInfo ki = Console.ReadKey(true);
                if (ki.Key == ConsoleKey.X)
                {
                    break;
                }
            }
        }

        public class CollectionHub : Hub
        {
            public void Subscribe(string groupName)
            {
                Groups.Add(Context.ConnectionId, groupName);
                Console.WriteLine("Subscribed to: " + collectionName);
            }

            public Task Unsubscribe(string groupName)
            {
                return Clients[groupName].leave(Context.ConnectionId);
            }

            public void Publish(string message, string groupName)
            {
                Clients[groupName].flush("SignalR Processed: " + message);
            }
        }

    }
}
As you can see from the main I hosted the SignalR server in a specific URL. You can see another Class called CollectionHub inherited from Hub. So what is a hub? Hubs provide a higher level RPC framework, client can call the public functions declared in the hub. In the above Hub I declared Subscriber, Unsubscribe and Publish function. The clients can subscribe to messages by providing a Collection Name, it’s like joining to a chat room. Only the members in that group receives all the messages.
You will notice another function called Publish with a message and a groupName. The clients can call the publish method by passing a message and a group name. SignalR will notify all the clients subscribed to that group with the Message passed. So what’s this ‘flush’ function called in publish, it’s nothing but the function defined in the client. We will see that later.
We are done, run the console application and our SignalR server is ready to receive requests.
SignalR clients
First we will look into a Console client. Let’s see the code first.
using SignalR.Client.Hubs;
namespace Net.SignalR.Console.Client
{
    class Program
    {
        static void Main(string[] args)
        {
            var hubConnection = new HubConnection("http://localhost:8081/");
            var serverHub = hubConnection.CreateProxy("CollectionHub");
            serverHub.On("flush", message => System.Console.WriteLine(message));
            hubConnection.Start().Wait();
            serverHub.Invoke("Subscribe", "Product");
            string line = null;
            while ((line = System.Console.ReadLine()) != null)
            {
                // Send a message to the server
                serverHub.Invoke("Publish", line, "Product").Wait();
            }

            System.Console.Read();
        }
    }
}
Let’s go line by line.
-
Create a hub connection with the url where SignalR server is listening.
-
Create a proxy class to call functions in CollectionHub we created in the server.
-
Register an event and callback, so that Server can call client and notify updates. As you can the Event name is ’Flush’, if you remember the server calls this function in Publish function to update the message to clients.
-
Start the Hub and wait to finish the connection.
-
We can call any public method in declared in Hub using the Invoke method by passing the function name and arguments.
Run the console application and type anything and hit enter. You can see some thing like below.

The name prefixed ‘SignalR Processed’ is the message back from the SignalR server. So we are done with a console application.
Now how about we have to display the updates in a web application. Let’s see how to do it in web application. In web application I used javascript to connect to the SignalR server.
<html xmlns="http://www.w3.org/1999/xhtml">
    <script src ="Scripts/json2.js" type="text/jscript"></script>
    <script src="Scripts/jquery-1.6.4.min.js" type="text/javascript"></script>
    <script src="Scripts/jquery.signalR-0.5.3.min.js" type="text/javascript"></script>
    <script type="text/javascript">
           $(function () {
               var connection = $.hubConnection('http://localhost:8081/');
               proxy = connection.createProxy('collectionhub')
               connection.start()
                    .done(function () {
                        proxy.invoke('subscribe', 'Product');
                        $('#messages').append('<li>invoked subscribe</li>');
                    })
                    .fail(function () { alert("Could not Connect!"); });


               proxy.on('flush', function (msg) {
                   $('#messages').append('<li>' + msg + '</li>');
               });

               $("#broadcast").click(function () {
                   proxy.invoke('Publish', $("#dataToSend").val(), 'Product');
               });

           });
    </script>
    <body>
        <div>
            <ul id="messages"></ul>
            <input type="text" id="dataToSend" />
            <input id="broadcast" type="button" value="Send"/>
        </div>
    </body>
</html>
You can install SignalR Javascript client from Nuget and it will install all the required js files. The code looks very similar to the one in Console application. So not explaining in detail.
Now if you run all three application together and any update in one client will reflect in other. As you can see in web client we use Javascript for DOM manipulation, so the page will never refresh but you will see the updated info.

I hope this post might help you to get started with SignalR.
Dowload the source code.
Happy coding….

